
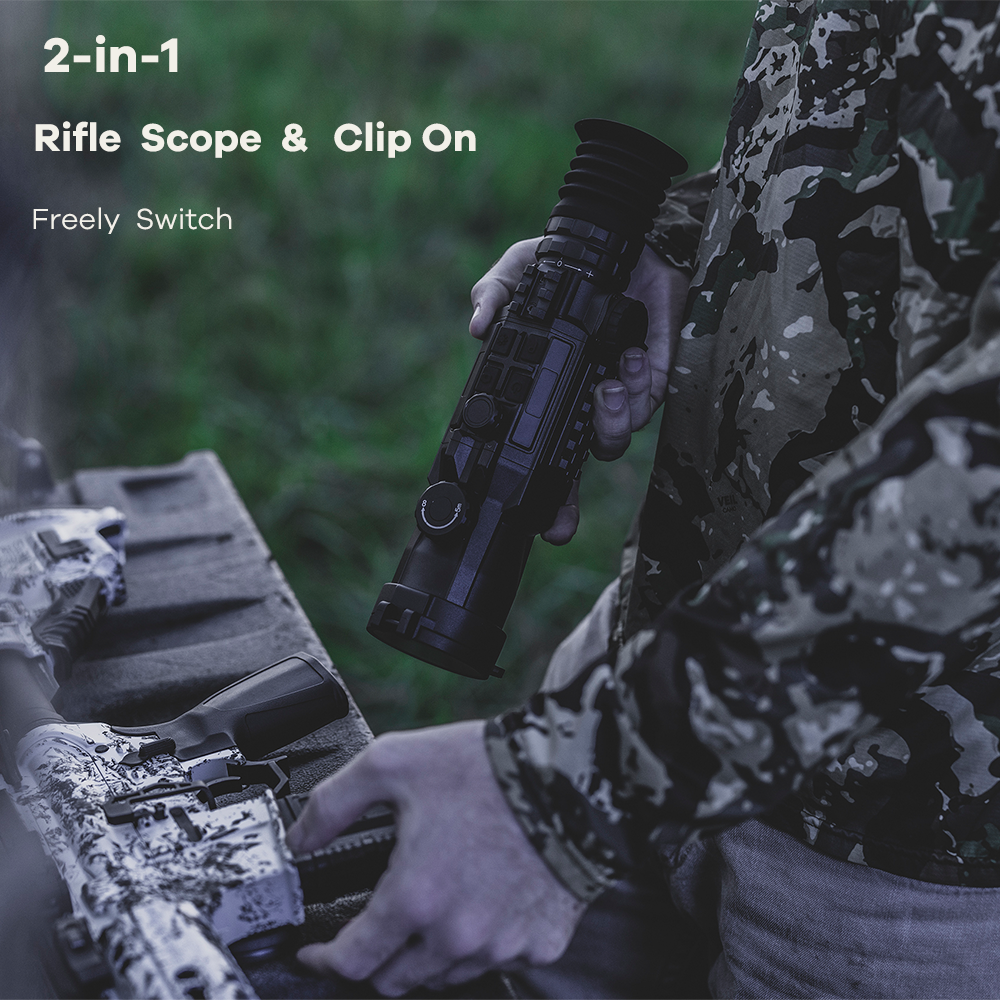
Learning how to sight in a thermal scope is crucial for achieving precision in your shooting endeavors. With a thermal scope, you gain the advantage of detecting heat signatures, making it easier to spot targets in various conditions. Unlike night vision scopes, thermal scopes like the 2-in-1 thermal clip on rifle scope DAL666 LRF offer superior versatility, functioning effectively both day and night. The 640 thermal scope provides more accuracy compared to the 384 thermal scope, enhancing your shooting experience.
Preparation Steps
Before you begin sighting in your thermal scope, it’s essential to prepare adequately. This preparation ensures a smooth and efficient process, allowing you to achieve the best results with your AirSeeker thermal scope.
Gathering Necessary Items
To start, gather all the necessary items for sighting in your AirSeeker Scope:
Thermal scope and firearm: Ensure your firearm is compatible with the AirSeeker thermal scope you plan to use. The AirSeeker heat-caster scope is a popular choice for many shooters due to its 2-in-1 thermal scope & clip on modes swith and its 2K clarity.
Suitable target with heat signature: Use targets that emit a heat signature. Common options include hand warmers or aluminum foil. These materials help you see the target clearly through the AirSeeker thermal scope.
Tools for adjustments: Have tools ready for making adjustments to your AirSeeker Scope. These might include screwdrivers or wrenches, depending on your scope’s mounting system.
Setting Up the Environment
Creating the right environment is crucial for sighting in your AirSeeker thermal scopes effectively:
Choosing the right location: Select a location that offers a clear line of sight and minimal obstructions. An open field or shooting range is ideal. Ensure the area is safe and free from distractions.
Ensuring safety measures: Safety should always be your top priority. Make sure you have protective gear, such as ear and eye protection. Inform others in the vicinity about your activities to prevent accidents.
Optimal conditions for sighting: Aim to sight in your AirSeeker Scope during optimal weather conditions. Clear skies and moderate temperatures provide the best environment for accurate adjustments. Avoid windy or rainy days, as these can affect your results.
By following these preparation steps, you set yourself up for success with your AirSeeker thermal scopes. Remember, AirSeeker Corp offers a range of scopes designed to meet various needs, so choose the one that best fits your requirements. Whether you’re using an AirSeeker thermal scope for hunting or security, proper preparation ensures you get the most out of your equipment.
Understanding Your Thermal Scope
Understanding your thermal scope is essential for maximizing its potential. The AirSeeker DAL666 series offers advanced features that enhance your shooting experience. By familiarizing yourself with these features, you can make the most of your AirSeeker scope.
Features and Functions
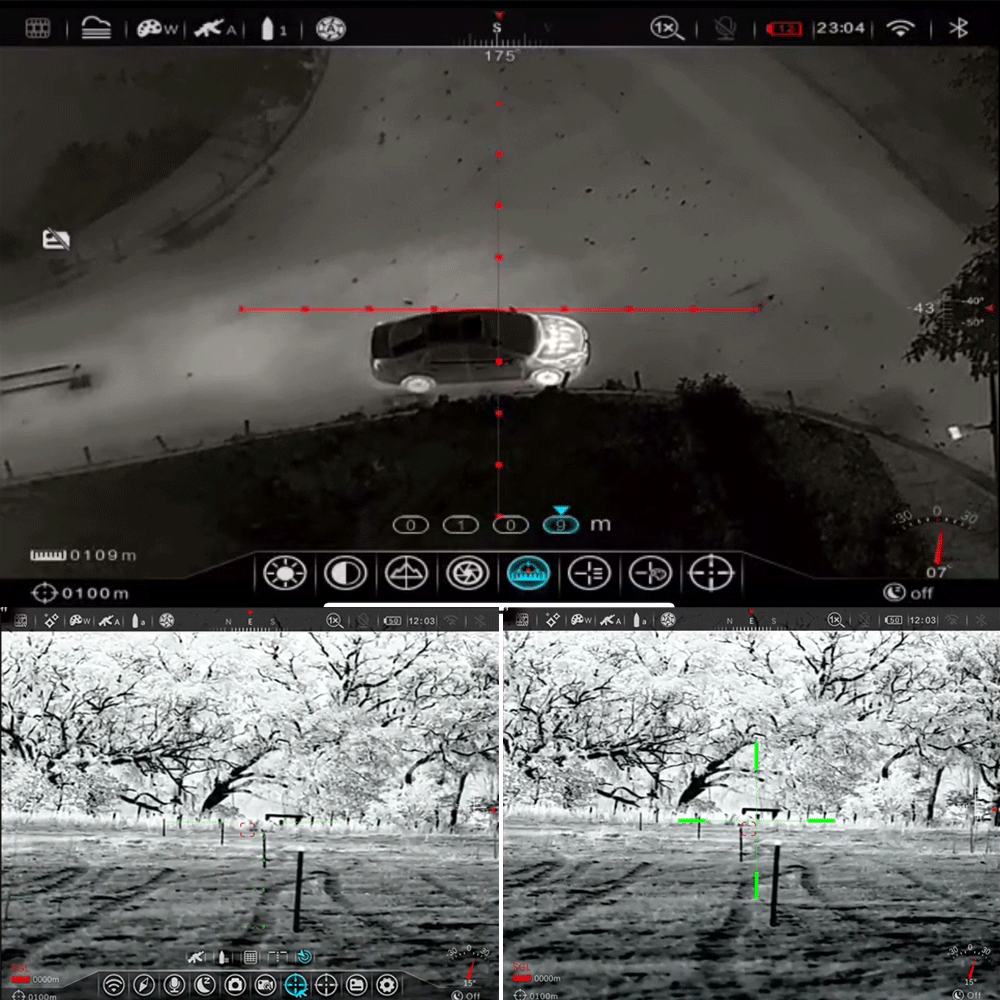
Reticle options and zoom capabilities
The DAL666 thermal scope come equipped with 7 reticle types, 5 reticle colors. These options allow you to choose the best reticle for your specific shooting needs. Whether you prefer a simple crosshair or a more complex design, the DAL666 has you covered. Additionally, the zoom capabilities of the DAL666 scope provide flexibility in targeting. You can easily adjust the zoom to get a closer look at your target, ensuring precision in every shot.
Battery life and power management
Battery life is a crucial aspect of any thermal scope. The DAL666 themal scope excels in power management, offering large battery capacity of 4400mAh and the battery can be removed and recharged , plus IBC-1 battery charger + IBP-1 battery pack×2 in the package, which extends battery life for prolonged use. You won’t have to worry about your scope dying in the middle of a hunt. With efficient power management, the thermal scope DAL666 ensures you stay focused on your target without interruptions.
Initial Thermal Zeroing
Zeroing the scope
Zeroing your scope is the first step in achieving accuracy. Begin by mounting your scope securely on your firearm. Use a stable shooting rest to ensure consistency. Take a shot at a target with a heat signature, such as a hand warmer. If the point of impact doesn’t match your aim, adjust the scope accordingly. The AirSeeker scope profile manager simplifies this process, allowing you to save multiple zeroing profiles for different distances.
Zeroing profile Reticle
·Press and hold the rotary encoder to enter the main menu;
·Turn the rotary encoder to select the “Gun Type/Bullet Type/Shooting Table/Shooting Table Reticle Switch/Ballistic Calculation Switch”;
1.When “Gun Type” is selected, press the menu button to call out the gun type selection interface, and turn the rotary encoder to adjust the gun type. Gun type has “A/B/C” options. Press the menu button to confirm selection and return to the upper menu, press the power button to return to the upper menu, press and hold the menu button to return to the home screen.
2.When “Bullet Type” is selected, press the menu button to call out the bullet type selection interface, and turn the rotary encoder to adjust the bullet type. Gun type has “1/2/3” options. Press the menu button to confirm selection and return to the upper menu, press the power button to return to the upper menu, and press and hold the menu button to return to the home screen.
3.When “Shooting Table” is selected, press the menu button to call out the interface of entered shooting table, and you can view the entered distance and corresponding offset. See Chapter XVIII Shooting Table Entering for specific operations.
4.When “Shooting Table Reticle Switch” is selected, press the menu button, the open/close button appears, turn the rotary encoder, and select open/close circularly. When opened, the shooting table reticle can be started. The center of the shooting table reticle is the same as the aiming reticle position under the current zeroing distance, and the zeroing distance is taken as the starting point to display the corresponding aiming point positions under different target distances.
5.When “Ballistic Calculation Switch” is selected, press the menu button, the open/close button appears (if the shooting table reticle is also opened), turn the rotary encoder, and select open/close circularly. When the ballistic calculation is turned on and the system knows the target distance, it can automatically generate a new aiming point superimposed;
Shooting Table Entering and Ballistic Calculation
DAL666 supports the function of entering the shooting table of different gun types by different users. The so-called firing table contains the ballistic information corresponding to different gun types and different bullets. Users can directly record the shooting table information in the device.


No need to manually upload, you can set the shooting table in the device.
Zeroing
Press and hold the rotary encoder to enter the advanced menu screen, select the return-to-zeroing
adjustment option, and press the rotary encoder to enter the submenu of the zeroing function; According to the selected target distance, select or add the new zeroing distance (It can save three different distance);
When the zeroing distance is set up, turn the encoder to select the zeroing function, and press the encoder to go to the zeroing screen. The coordinate positions of the reticle (X axis and Y axis) are displayed in the upper left corner of the display;
Shoot at the target. Observe the position of the actual point of impact. If users can not see the point of impact due to the surrounding environment, you can put a heat source in the point of impact.(E.g. incense,cigarette)
If the point of impact and the aiming point (the center point of the reticle)do not match each other, keep the aiming position still, and meanwhile, press the photographing/video recording button the image brightness button to freeze the picture, and then a snow-like freezing icon appears on the left of the display; (It can also be moved directly through the X or Y axis to the calibration location)
Press the rotary encoder to switch between the X axis and Y axis, and the position where the icon is highlighted indicates the currently selected item, with the icon turns blue;
Rotary encoder to move the center of reticle to the point of impact by X axis and Y axis,
After reticle move to the real point of impact, long press the encoder to save the reticle’ s location and exit to advanced menu; After moving the reticle, a little white dot appears on the display, indicating the position of the reticle before moving;
Repeat aiming and shooting, until the position of the point of impact is consistent with that of the aiming point.
Tips: Users can switch the zeroing distance in the sub-menu after setting the different distance zeroing finished.
Adjusting for windage and elevation
After zeroing, fine-tune your thermal scope by adjusting for windage and elevation. These adjustments ensure your shots remain accurate, even in varying conditions. Use the intuitive controls on your DAL666 to make precise changes. Test your adjustments by taking additional shots and observing the results. With practice, you’ll master the art of sighting in your thermal scope.
Expert Testimony: AirSeeker offers expert advice to help you decide which thermal riflescope to buy, covering topics including how thermal imaging works, and how sensor resolution affects image quality.
By understanding the features and functions of your DAL666 thermal scope, you enhance your shooting capabilities. The AirSeeker Scope Features, combined with proper zeroing techniques, ensure you achieve the best performance from your thermal scope.
The Sighting Process
Mastering the sighting process for your thermal scope is essential for achieving precision and accuracy. This section will guide you through the steps to ensure your DAL666 Thermal Target aligns perfectly with your point of aim.
Initial Alignment
Positioning the firearm
Begin by positioning your firearm securely. Use a bench rest to stabilize your rifle, ensuring minimal movement during the sighting process. This stability is crucial for accurate alignment. A stable platform allows you to focus on aligning the reticle without worrying about external factors affecting your aim.
Aligning the reticle with the target
Once your firearm is secure, align the reticle with the Thermal Target. Look through the scope and adjust the position until the reticle centers on the target. This step requires patience and precision. Ensure that the reticle is perfectly aligned before proceeding to the next stage.
Fine-Tuning Your Thermal Zeroing
Making incremental adjustments
After achieving initial alignment, it’s time to fine-tune your thermal zeroing. Adjust the thermal scope using the controls to make small, incremental changes. These adjustments help you account for variables such as windage and elevation. Remember, even slight changes can significantly impact your accuracy.
Hunting Experts share: “Adjusting sensitivity settings is crucial for optimizing performance in specific hunting conditions.”
Testing accuracy with multiple shots
With adjustments made, test the accuracy by firing multiple shots. Observe where each shot lands in relation to the Thermal Target. If necessary, continue to adjust the thermal scope to refine your aim. Consistent testing ensures that your scope is accurately zeroed.
Case Studies: Successful sighting processes often involve repeated testing and adjustments to achieve optimal results.
By following this guide, you can effectively bore sight the thermal scope and achieve precise alignment. Remember to input distance into AirSeeker settings for accurate adjustments. Whether you’re a hunting expert today or just starting, mastering these steps will enhance your shooting capabilities.
Troubleshooting Common Issues
When using a thermal scope like the Feyachi, you might encounter some common issues. Understanding how to troubleshoot these problems ensures you maintain accuracy and reliability in your shooting endeavors.
Inconsistent Accuracy
Inconsistent accuracy can frustrate any shooter. Addressing this issue involves a few straightforward checks.
Checking for loose mounts
Loose mounts often cause accuracy problems. Ensure that all mounting screws on your Feyachi thermal scope are tight. A secure mount guarantees that your scope remains stable during use. Regularly inspect the mounts to prevent any loosening over time.
Re-evaluating environmental factors
Environmental factors significantly impact your shooting accuracy. High winds or extreme temperatures can alter the trajectory of your shots. Re-evaluate these conditions if you notice inconsistencies. Adjust your aim accordingly to compensate for these variables. Using High Contrast Targets can help you better see the impact of environmental changes on your shots.
Scope Malfunctions
Scope malfunctions can disrupt your shooting experience. Identifying and addressing these issues promptly is crucial.
Identifying technical issues
Technical issues with your Feyachi thermal scope might arise. Check the battery life and ensure the power source functions correctly. Inspect the lens for any dirt or obstructions that might affect visibility. A clean lens provides a High Contrast view, essential for accurate targeting.
Contacting manufacturer support
If technical issues persist, contacting Feyachi’s manufacturer support becomes necessary. They can provide expert guidance and solutions tailored to your specific problem. Manufacturer support can Highlight Difference between normal operation and potential malfunctions, ensuring you receive the best assistance.
Expert Tip: “Regular maintenance and understanding your equipment’s functionality can prevent many common issues.”
By following these troubleshooting steps, you can maintain the performance of your Feyachi thermal scope. Whether you’re using it for hunting or target practice, addressing these issues ensures you achieve the best results. Remember, a well-maintained scope enhances your shooting Art, providing a reliable tool for any shooting scenario. For more insights, check out resources like Flipboard Share on Pocket for additional tips and tricks.
Maintenance and Care
Proper maintenance and care of your thermal scope ensure its longevity and optimal performance. By following these guidelines, you can expertly sight your scope and maintain its accuracy over time.
Regular Cleaning and Maintenance
Cleaning the lens
To keep your thermal scope in top condition, clean the lens regularly. Use a soft brush or compressed air to remove dust and debris. For stubborn spots, apply a lens-specific cleaning solution with a microfiber cloth. Avoid using harsh chemicals that might damage the lens coating. Regular cleaning maintains optical clarity, allowing you to see your black target board made of foil tape clearly.
Inspecting for damage
Inspect your scope for any signs of damage. Check for cracks or scratches on the lens and ensure all screws are tight. Loose or frozen screws can affect the scope’s alignment. Regularly inspect the exterior surfaces and electric contacts. This routine helps prevent issues that could compromise your shooting accuracy.
Storage Tips
Proper storage conditions
Store your thermal scope in a cool, dry place. Avoid exposing it to extreme temperatures, which can affect its components. Use a protective case to shield it from dust and moisture. Proper storage conditions prevent cold damage and ensure your scope remains in excellent working order.
Battery care
Battery life is crucial for your thermal scope’s performance. Remove the batteries if you plan to store the scope for an extended period. This prevents leakage and preserves battery life. Consistent battery maintenance ensures your scope is ready for use whenever you need it.
Michael Valderrama, a renowned expert, emphasizes the importance of gentle handling and regular firmware updates for maintaining electronic components.
By following these maintenance and care tips, you ensure your thermal scope remains reliable and effective. Whether you’re using hand warmers as targets or a black board for sighting, proper care enhances your shooting experience. Remember to comment on any unusual findings during inspections and address them promptly. Your attention to detail will keep your scope in peak condition, ready for any shooting scenario.
Mastering the sighting process of your thermal scope involves several key steps. You begin by gathering necessary items and setting up the environment. Understanding your thermal scope’s features, like those offered by Pulsar, enhances your shooting experience. Regular maintenance ensures your equipment remains reliable. Practicing consistently with your thermal target improves proficiency. Remember, Pulsar offers thermal zeroing, making it easier to achieve precision. Share your experiences on platforms like Facebook, Twitter, and Reddit. Save your progress and continue refining your skills. Night vision scopes, including the Pulsar Thermal targets, stand as essential tools for any serious shooter.
Welcome to AirSeeker, an ODM solution provider with 12 years of experience specializing in thermal imaging technology. We are dedicated to offering top-notch customized solutions for outdoor hunting enthusiasts, outdoor observers, shooting enthusiasts, farm monitoring, and law enforcement agencies. Product ranges from thermal scope for rifles, thermal clip on, thermal monocular, binoculars, including night vision clip on; All products are not only truly waterproof and impact-resistant but also feature sniper-level ballistic calculation technology, ensuring clear and reliable visibility in any environment.
Business Cooperation : info@airseekertec.com